Wednesday, February 7, 2018

DIY Garlic & Herb Cream Cheese Spread Recipe


There is this absolutely wonderful teeny-tiny little box of cheese that my husband and I LURVE to buy once in a while. It's a pretty fancy kind, comes in beautiful packaging and is so NOT in our budget!

So when I had a little spare cream cheese one night before dinner (a very rare thing in our house), I decided to try my hand at copying that wonderful fancy-pants cheese.


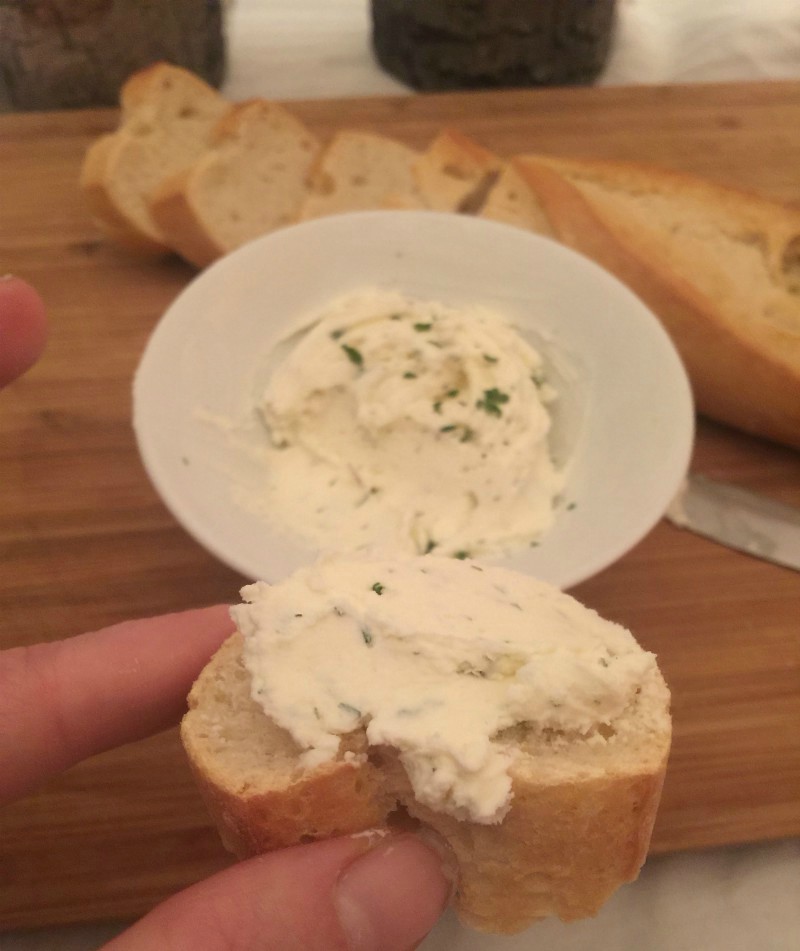
There were a few things I knew I'd need to get down to make it right - the texture, which was light and airy, the taste which was a strong, perfect garlic with sweet herbs, and the look, because who doesn't want something pretty on their table!


And I got it! Seriously, on my first try, that first bite was perfection! The family agreed so too. Although the original cheese isn't made with packaged cream cheese, this version comes pretty darn close in flavor and texture!

And now I'm sharing my little recipe with you! It's super simple, really quick and sooo good on a nice baguette! It adds that nice extra touch to dinner when you're eating something light too. In fact, I think I could seriously just eat this for dinner!


Garlic Herb Cream Cheese Spread

Ingredients:

  • 1/4 cup cream cheese
  • 1/2 tsp. garlic salt 
  • 1/4 tsp basil
  • 1/4 tsp dill
  • 1/4 tsp parsley flakes
  • 1/4 tsp thyme
Instructions:
Whip up all the ingredients together, being sure to mix them really well. If you have a hand mixer, you can beat it for a minute to get that nice, lightly whipped texture. Serve it in a nice little dish. Then just fancy it up with a sprinkle of extra parsley on top! 

You might also find you like less garlic in it, or more! Experiment and see how it comes out best. Either way, you'll be spending just 1/8th of what a wheel of that already-made cheese costs. 

Enjoy!


Monday, February 5, 2018

DIY Crochet Dog Sweater


This Pattern is now featured on Crochet News! Check it out here along with other seriously cute doggie patterns!

A few years, you might remember, I did a post on a crocheted dog sweater for our dog Snowflake. I'm still amazed at how many visits a day that post gets, and how many questions too! I could never answer most of the questions, however, since I was mainly flying by the seat of my pants as a new crocheter when I made that pattern! 😅


So after a few years of making similar sweaters for Snowflake, I came up with this easier version and tutorial for basically the same pattern. Just modified - and better!

The great thing about this pattern is that it can be made to fit any size dog. Just take measurements as I wrote below, or try to guess some out using the dog size charts I've included. I worked pretty hard to put this all together, so I hope it's easy to understand and, most importantly, comes out great! If there are still questions, however, feel free to leave them in the comments!

So, here we go...

DIY Crochet Dog Sweater Pattern


Measuring Your Dog
First, you'll need to make all of your measurements.You can either measure your own dog or use the handy charts above from Pet It Dog Apparel to guesstimate the measurements. If you have a larger dog, then you can probably find some estimated measurements with a quick search :) Here is what you need to measure, along with a chart I drew up that might help:

  • (A) Collar (around the neck, loosely) 
  • (B) Back (from the collar to where you'd like the sweater to end)
  • (C) Back Girth (around the back, leave out the tummy)
  • (D) Tummy girth (from side to side of the tummy, leg to leg)
  • (E) Tummy length (from bottom of sweater length to front legs)

Now that you have your measurements, you can begin crocheting!

1. Cast on your yarn and make a chain the length of the Back (B) measurement. Be sure your back ends at a good point for both the tummy and back - as in, you don't want your dog weeing on the sweater, so don't make it too long ;)

2. Now you can use any stitch pattern you'd like to create the back of the sweater. I single crocheted in back loops only to make mine. I like making this sort of pattern because it makes the sweater stretchier. Crochet in each chain across.


3. Now continue to crochet in each stitch across until you have a rectangle piece measuring the length of your (C)Back Girth measurement (as in the photo above). This is the top of your sweater that will cover your dog's back.


4. Now you're going to create the tummy portion. Begin to crochet in the next row as you have been, but don't go to the end - only go until you reach you (E) Tummy Length measurement. Stop here and turn your work.


5. Chain 1, and continue your stitch pattern on these shorter rows until you make this small square your (D)Tummy Girth measurement. You can what I mean in the picture above. Now you have to body of your sweater.


6. Now you'll sew the two ends together using your hook. Fold the tummy square over to the other side of the sweater so it looks like the picture above. Using your hook slip stitch the sides together. You can also choose to cast off first and sew the two sides together with a yarn hook, but I prefer this way since it's simpler and makes cleaner lines.


7. Now you'll be making your collar. Go to the front of your seater where the big opening is. Attach your yarn to the top of the rows (as shown) and crochet into the top of each row across. When you reach the end, chain enough stitch so that this whole side will measure the length of your (A) Collar measurement. Be sure to leave some extra lag here since you don't want it to be too tight if your dog ever gets stuck on something.


8. Once you have your length, attach your chain to the other side of the collar, where you attached your yarn. You now have a big circle the length of the collar measurement. Now you'll continue to crochet in rounds until the collar is as high as you'd like it to be. You can do one layer as I did, or you can make it longer and folded over.

And that's all there is to make this little sweater for your dog. As you can see, it's super easy to make for any size dog and can easily be adjusted with different stitch patterns to make it however you'd like. Of course, you could also add some cute buttons, embroidery, or mix up different colors of yarn.

I'm including a few graphics down here to help you out in remembering the steps so you can Pin them for later. Once you've made this sweater once it's actually really easy to make again and again!